Jupyter Notebook provides a simple way to run code in Python, R, Scala and more. While it’s mainly used in research related fields, Jupyter can be applied to a wide variety of applications.
Jupyter is especially useful for two groups in particular. Data scientists and machine learning experts benefit from modular execution. They can load a large data set once and try many different experiments/code changes; saving an enormous amount of time in the process. Academics make up the other group. Documenting work as you go could not be easier. Professors can auto grade students work using tools like Vocareum, built to work with Jupyter.

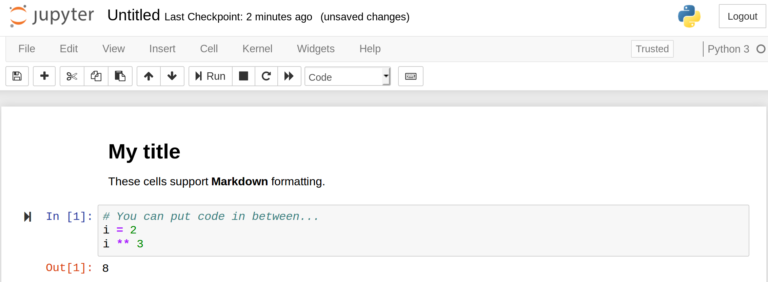
Above is a screenshot directly from a notebook. It runs in a web interface and is quite easy to use. Markdown syntax can be added to create documentation blocks — much more expressive than the brief inline comments we programmers often get used to.
Installing Jupyter Notebook
Some prefer the native installation while others like to keep everything in a self-contained Docker container. I will outline both methods — choose the one that works best for you.
Native
Jupyter Notebook is easy to install with pip. I assume you already have Python and pip installed. If that’s the case, simply run
python -m pip install jupyter #for Python2
Congratulations, that’s it! To run Jupyter, simply open up a new terminal in the directory you want the notebooks to be saved. Then type:
Your default browser should automatically open to the Jupyter instance.
Docker
This guide assumes Docker is already installed. If you’re unfamiliar with Docker, please check out their guide.
Using Jupyter with Docker is easy, a container is already maintained. Simply run the container with the following command:
The -v flag is used to share a local directory with Docker. /path/to/jupyter/directory should point to a local directory where you want the notebooks to be saved. When inside the Jupyter instance, be sure to save everything inside the /work directory, or it will not be saved.
Once the Docker container is launched, a unique URL will be printed to the console. Copy and paste that into a web browser and you’re good to go! You may notice the example below says 127.0.0.1 or a seemingly random string of numbers. If this is the case for you, be sure to substitute 127.0.0.1. For instance, open a web browser and go directly to the URL http://127.0.0.1:8888/?token=f19d2097c0e3455e3589c985b182b93a6c9f022612d9a2cc. Your token will be different!

Your first Jupyter project
With Jupyter successfully installed, your screen should be similar to the one pictured below.

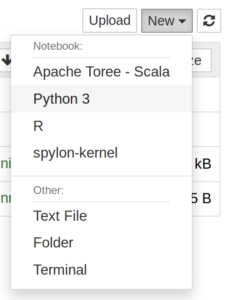
Once Jupyter Notebook is installed and launched, we can create our first actual notebook. If you installed with Docker, be sure to click on the work directory first. Then click the New dropdown, then select Python 3 (or a different language if you prefer).

All that remains is filling it with content. Each content block is a cell. There are two main types of cells: code and Markdown.
Let’s create a new code cell.
Run the code in a cell by clicking the play button with the cell selected, or by hitting ctrl + enter on the keyboard.

Now, let’s demonstrate one of the main benefits of Jupyter. Say we need to load data, which takes a lot of time. If this was a standard Python script, the data would have to be loaded during each subsequent run. This is not the case with Jupyter. We can simply put the data loading code into its own cell.

Saving & Checkpoints
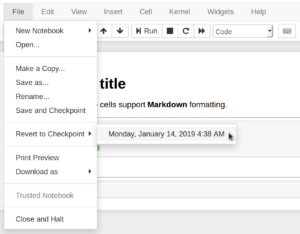
To save your work, simply click the Save & Checkpoint button.

As the name suggests, manually saving also creates a checkpoint. Checkpoints are a form of basic version control — you can easily roll back to any checkpoint later on. Work in a notebook will also be periodically auto-saved, but checkpoints must be created manually.
To share your work with someone else, simply send them the .ipynb file. They can launch the file using their own Jupyter installation and pick up right where you left off. While you can use Jupyter with a version control system (like Git of Mercurial) by checking in the .ipynb files, it’s not easy to see the individual code changes later. This is my single biggest complaint when using Jupyter. If anyone has found a solution, I would love to hear it!


Thanks for the post. How did you install the left arrow (the arrow that is used to get information or help)?
Hi Ivan, thanks for reading! I’m not sure I understand what you mean by “left arrow”? Could you provide a screenshot?